Copyright © 2013 INRIA
Authors: Emilie Balland, Milan Kabac, Damien Martin-Guillerez, Paul van der Walt
Table of Contents
List of Figures
List of Examples
This manual describes DiaSuiteBOX, how it can be used to develop application and drivers based on the Sense / Compute / Control paradigm. It is composed of four sections:
- Chapter 1, General concepts explains the concepts behind DiaSuite and DiaSpec
- Chapter 2, Application development contains a quick tutorial to develop an application with the DiaSuite SDK
- Chapter 3, Device driver development contains tutorials to develop device drivers with the DiaSuite SDK
- Chapter 4, DiaSpec grammar is the reference of the DiaSpec grammar
Table of Contents
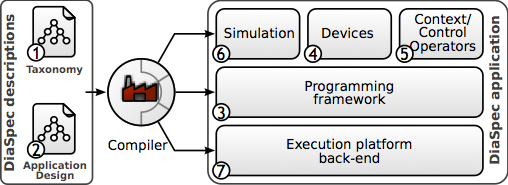
DiaSuite provides a tool-based development methodology that relies on the Sense/Compute/Control (SCC) paradigm and covers the whole development process, as depicted in Figure 1.1, “The development life-cycle of an SCC application using DiaSuite ” . This paradigm originates from the Sense/Compute/Control architectural pattern and is pervasively used in domains such as telecommunications, building automation, robotics and avionics. Like a programming paradigm, the SCC paradigm provides concepts and abstractions to solve a software engineering problem. These concepts and abstractions are dedicated to a design style, raising the level of abstraction above programming. Because of its dedicated nature, such a development paradigm allows a more disciplined engineering process, as advocated by Shaw [Shaw, 1995].
In the following sections, we briefly illustrate each step of the DiaSuite methodology using a simple application that displays ``Hello World'' on a TV screen when motion is detected by a motion detector.
DiaSuite provides a design language, named DiaSpec, that is dedicated to the SCC paradigm. This design language consists of two layers: the taxonomy layer and the application design layer. The grammar of DiaSpec is available at DiaSpec grammar .
Example 1.1. Taxonomy of the `'HelloWorld'' example
device LocatedDevice {
  attribute location as String;
 }

device MotionDetector extends LocatedDevice {
	source motion as Boolean;
}

device TvMessenger extends LocatedDevice {
	action SendMessage;
}

action SendMessage { display(message as String); }
The
extends keyword allows to build a hierarchy of entities. A child entity inherits the actions, sources, and attributes from the parent entity. Contrary to object-oriented programming languages, there is no notion of refinement of the inherited elements. In our example, MotionDetector and TvMessenger both have a location attribute, inherited from LocatedDevice . This attribute allows to locate where the device is deployed (e.g., the name of the room).- Sensors send information sensed from the environment to the context layer through data sources
- Contexts refine (aggregate and interpret) the information given by the sensors
- Controllers transform the information given by the contexts into orders for the actuators
- Actuators trigger actions on the environment
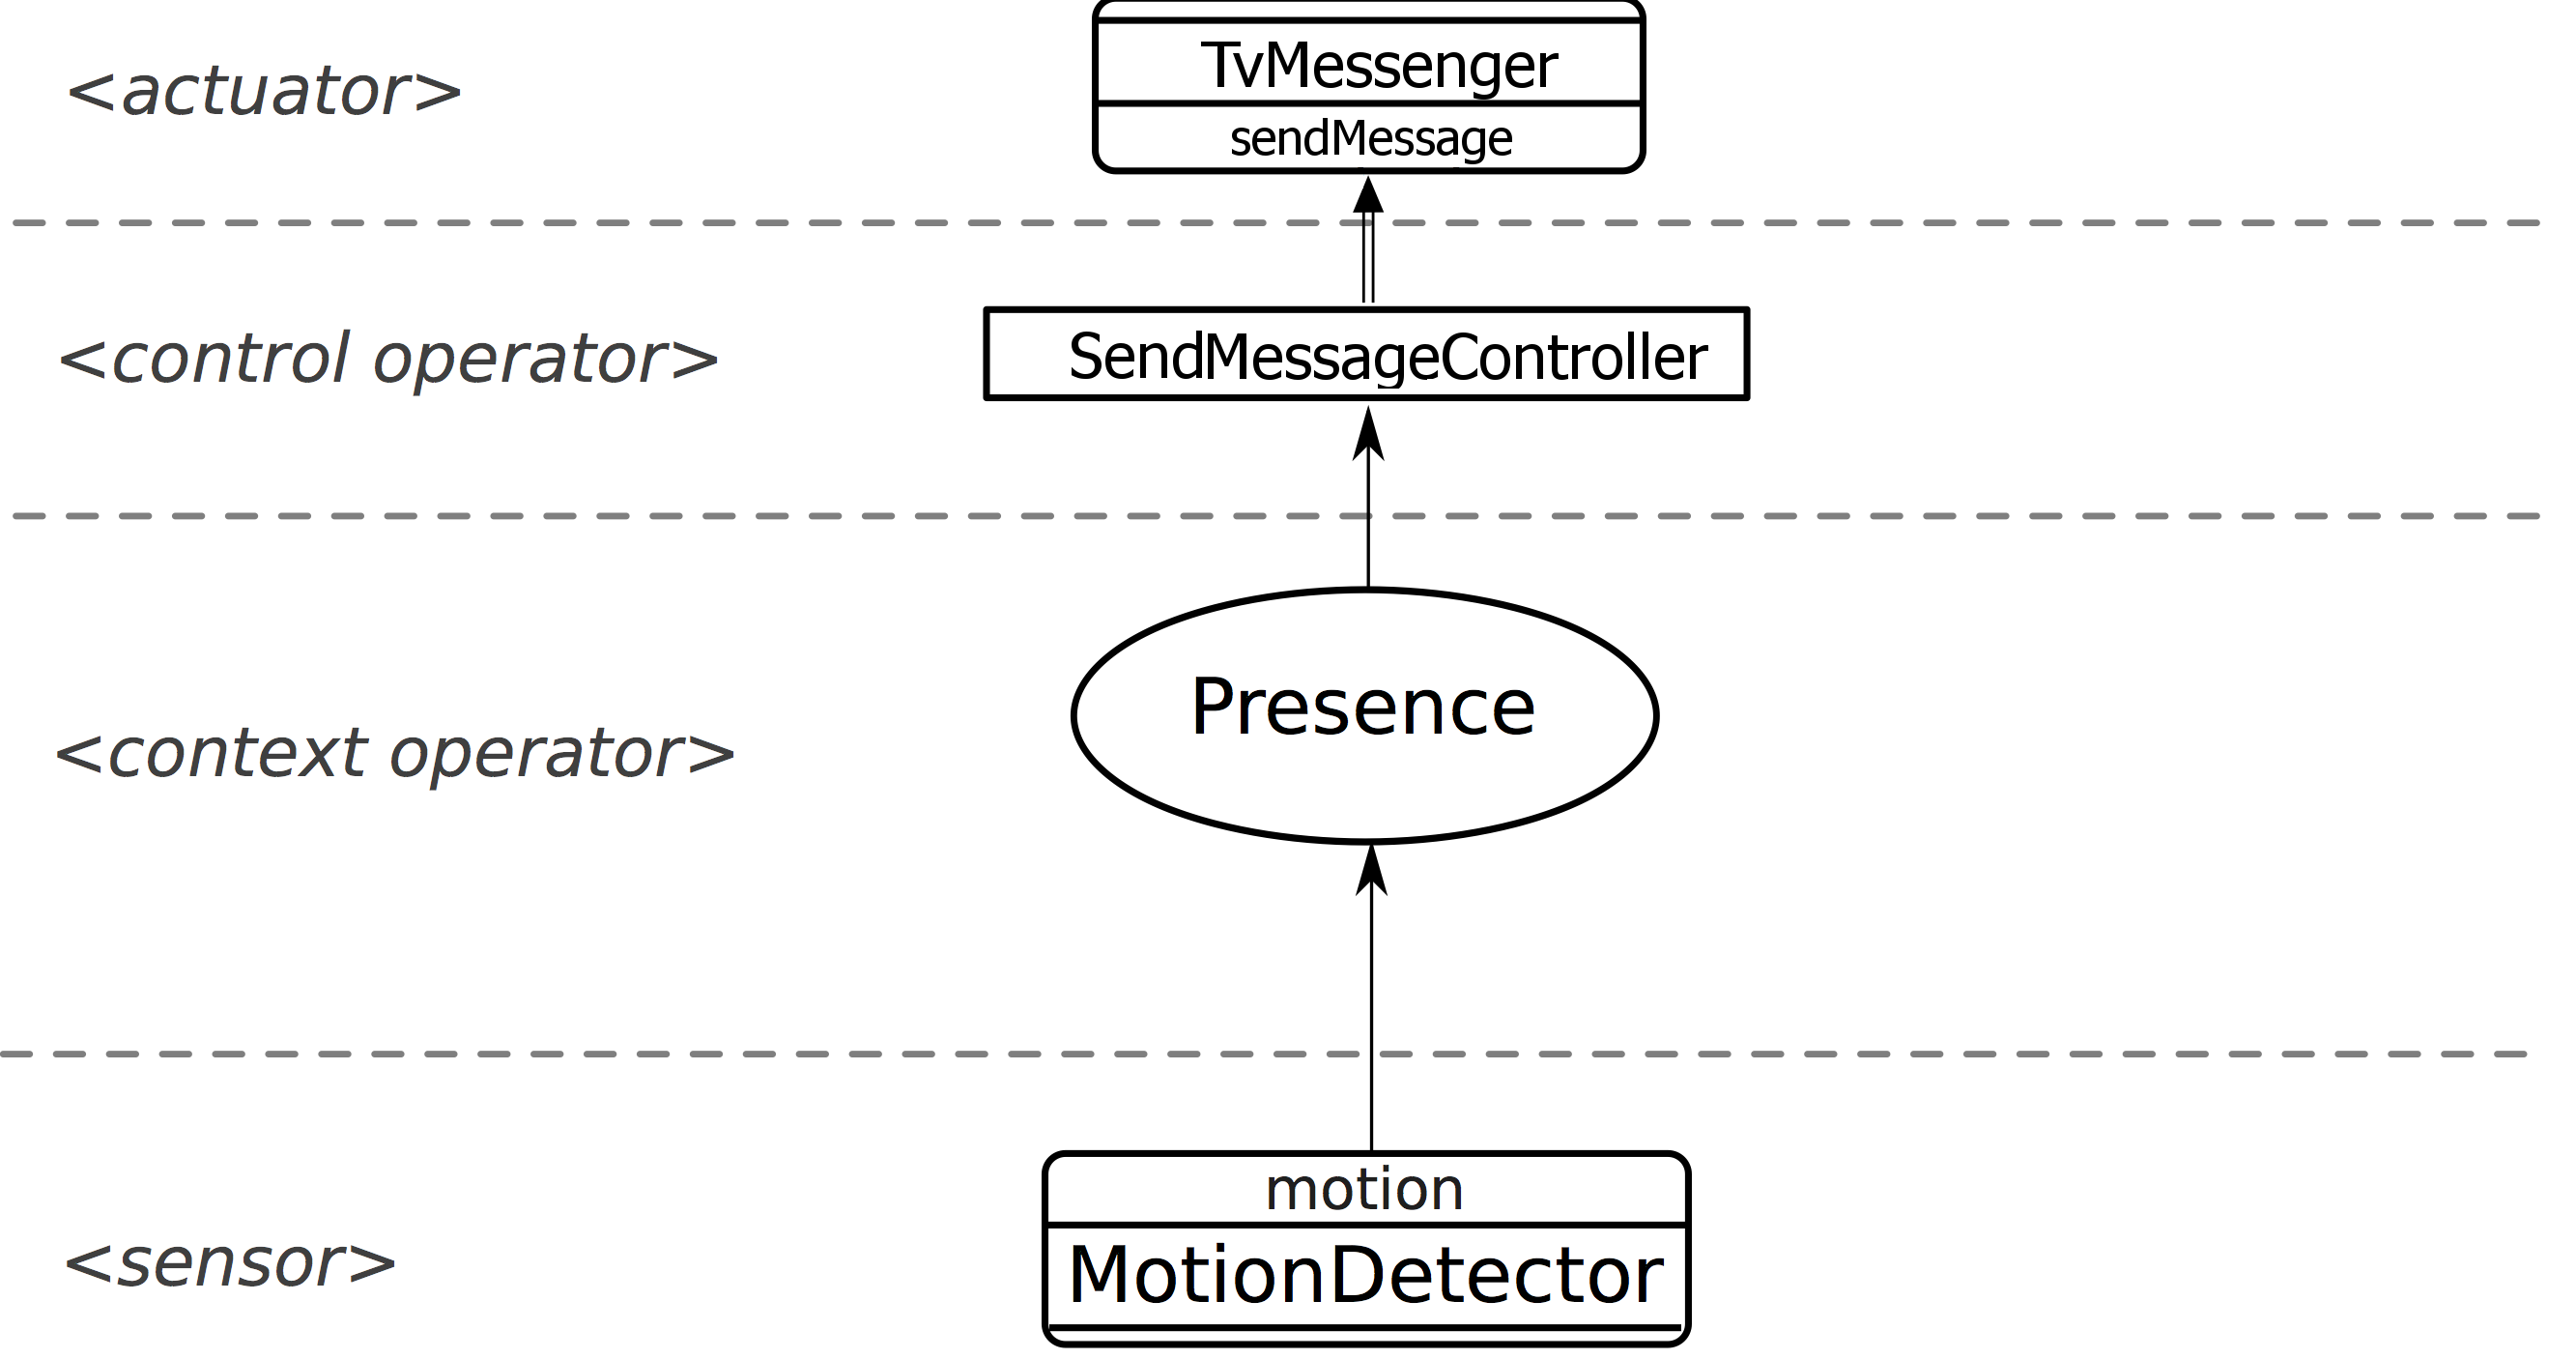
For example, the ``HelloWorld'' application is specified by a
Presence context, responsible for reporting when motion is detected, and by SendMessageController that displays messages on TV screens when presence is reported. The application design is given in Figure 1.2, “Graphical representation of the ``HelloWorld'' application design. ” . The corresponding DiaSpec specification is as follows:
context Presence as Boolean {
  when provided motion from MotionDetector
    always publish;
}

controller SendMessageController {
  when provided Presence
    do SendMessage on TvMessenger;
}
Sensors are proactive or reactive components whereas contexts, controllers and actuators are always reactive. All computations are thus initiated by a publish/subscribe interaction from the sensors. A context or a controller is defined by a list of interaction contracts separated by commas.
An interaction contract is composed of three parts:
- The activation condition . A context can only be activated either by a data requirement from a parent context (
when required) or a new value published from either a context or a sensor (e.g.,when provided Presence,when provided motion from MotionDetector). A controller can only be activated by a new value from a context (e.g.,when provided Presence) ; - The data requirements list . A context can require data from sensors or contexts (e.g.,
get motion from MotionDetector, Presence). A controller can only require data from contexts (e.g.,get Presence) ; - The emission . When activated, a context can either always or maybe or never publishes a new value ( corresponding respectively to
always publish,maybe publishandno publishdeclarations). For a controller, the emission part corresponds to a list of entity actions that the controller can call (e.g.,do SendMessage on TvMessenger).
Given a DiaSpec description, a compiler generates a dedicated Java programming framework (stage 3 in Figure 1.1, “The development life-cycle of an SCC application using DiaSuite ”). This framework guides and supports the programmer to implement the various parts of the software system: entities, contexts and controllers. Specifically, it includes an abstract class for each component declaration, providing abstract methods to guide the programming of the application logic (e.g., triggering entity actions) and concrete methods to support the development (e.g., entity discovery).
Implementing a component is done by sub-classing the corresponding generated abstract class and by implementing each abstract method of the super class (stages 4 and 5 in Figure 1.1, “The development life-cycle of an SCC application using DiaSuite ”). For example, the implementation of the Presence context is defined as follows.
package fr.inria.phoenix.scenario.helloworld.impl;

import fr.inria.diagen.core.ServiceConfiguration;
import fr.inria.phoenix.diasuite.framework.context.presence.AbstractPresence;
import fr.inria.phoenix.diasuite.framework.device.motiondetector.MotionFromMotionDetector;

public class Presence extends AbstractPresence {

    public Presence(ServiceConfiguration serviceConfiguration) {
        super(serviceConfiguration);
    }

    @Override
    protected Boolean onMotionFromMotionDetector(MotionFromMotionDetector motionFromMotionDetector) {
        return motionFromMotionDetector.value();
    }

}
By default, the component subscribes to all the motion detectors. It would have been possible to subscribe to a subset of the motion detectors by selecting them with respect to their attributes. To do so, the developer has to redefine the postInitialize method:
@Override
  protected void postInitialize() {
    discoverMotionDetectorForSubscribe.whereLocation("LivingRoom").subscribeMotion();
}
From the taxonomy description, the compiler generates a field for each entity that can be discovered. These fields correspond to dedicated filter objects on which it is possible to add filters over attributes associated with the entity class. For example, the Presence abstract class defines a discoverMotionDetectorForSubscribe field that returns a MotionDetectorFilter This filter can be refined by adding a filter over the location attribute inherited by the MotionDetector . This entity discovery support relies on a Java-embedded, type-safe Domain-Specific Language (DSL), inspired by the fluent interfaces proposed by Fowler [Fowler, 2005]. Existing works often use strings to express queries, deferring to runtime the detection of errors in queries. By using fluent interfaces, generated from the taxonomy declarations, the Java type checker ensures that the query is well-formed at compile time. In the expression above, it is for example not possible to pass anything else than a string to the whereLocation method as the location attribute is of type String .
The onNewMotion method is declared abstract in the AbstractPresence class and has to be implemented by the developer in the Presence sub-class. This method corresponds to the application logic of the Presence component. It is automatically called by the framework when the component is activated to process a new motion-source value published by any subscribed motion detector. For the sake of simplicity, the application logic presented here is trivial as the developer simply propagates the value from the sensor to the controller. A more realistic implementation would cross-check this information using motion detectors nearby.
The implementation of a controller component is very similar. For example, the SendMessageController is defined as follows:
package fr.inria.phoenix.scenario.helloworld.impl;

import fr.inria.diagen.core.ServiceConfiguration;
import fr.inria.phoenix.diasuite.framework.context.presence.PresenceValue;
import fr.inria.phoenix.diasuite.framework.controller.sendmessagecontroller.AbstractSendMessageController;

public class SendMessageController extends AbstractSendMessageController {

    public SendMessageController(ServiceConfiguration serviceConfiguration) {
        super(serviceConfiguration);
    }

    @Override
    protected void onPresence(PresenceValue presence, DiscoverForPresence discover) {
        if (presence.value()) {
            discover.tvMessengers().anyOne().sendMessage(null, null, "Hello World !", null);
        }
    }
}
The first parameter corresponds to the published value corresponding to the activation condition of the interaction contract. The discover parameter allows to call actions on entities. The DiscoverForPresence type is specialized, allowing the developer to only access entity actions that were declared in the emission part of the interaction contract.
The programming framework leverages the Java type checker to ensure the conformance between the design and the implementation. There are three basic conformance criteria: decomposition (each component in the design is implemented), interface conformance (each component implementation conforms to its design interface), and communication integrity (each component implementation communicates only with the components it is connected to in the design). In our approach, these criteria are expressed as Java typing constraints and verified by the Java type checker during compilation. As a result, our generative approach ensures that the implementation conforms by construction to its design.
Deploying an SCC application for testing purposes can be expensive and time consuming because it requires to acquire, test and configure all the necessary entities. To overcome this problem, DiaSuite provides support for testing applications with mock entities. This support corresponds to the fr.inria.phoenix.diasuite.framework.mocks.Mock class. For example, we can define the following JUnit test class:
package fr.inria.phoenix.scenario.helloworld.tests;

import static fr.inria.phoenix.diasuite.framework.mocks.Mock.*;
import static org.junit.Assert.*;

import org.junit.After;
import org.junit.Before;
import org.junit.Test;

import fr.inria.phoenix.diasuite.framework.mocks.MotionDetectorMock;
import fr.inria.phoenix.diasuite.framework.mocks.TvMessengerMock;
import fr.inria.phoenix.scenario.mailontv.impl.ComponentBinder;

public class HelloworldTest {

    @Before
    public void setUp() throws Exception {
        underTest(ComponentBinder.class);
    }

    @After
    public void tearDown() throws Exception {
        shutdown();
    }

    @Test
    public void test() {
    	MotionDetector detector = mockMotionDetector("MockMotionDetector")
        TvMessengerMock tv = mockTvMessenger("MockTvMessenger","LivingRoom");
        // Publish a motion value
        detector.motion(true);
        // And expect a message on the tv
        assertTrue(tv.expectSendMessage("HelloWorld"));
    }

}
Using mocks, you can make the device publish certain values on certain sources using the setXXX() methods while simply the source name do a publication on the source. Then you can test for action occurring with expectXXX() methods. Those methods return true if the action occurs and match the given parameters (if a parameter is not specified, then all values are accepted). The action is supposed to not have occurred after TIMEOUT milliseconds. This TIMEOUT can be modified any time in your tests.
An application is deployed in a specific execution platform, whether distributed (e.g., RMI, Web Service, and SIP) or local (e.g., OSGi, plain Java). For now, only the plain Java and OSGi back-ends are included in the public release. In doing so, a component is prepared to be deployed in the target execution platform while initializing communication mechanisms to enable component interactions using the target platform. Associated with the Java programming framework, a Java deployment framework helps the developer select a specific execution platform (stage 7 in in Figure 1.1, “The development life-cycle of an SCC application using DiaSuite ”).
Our approach allows an application to be deployed in a running platform, reusing available entities. For example, an application may be deployed on an OSGi platform and leverage existing deployed entities. More generally, as the entities are shared by several applications, their implementations are usually deployed separately. Then, the deployment of an application consists of only deploying the context and controller components, while reusing the available entities already deployed in the platform.
For example, when using the OSGi backend, the ComponentBinder class is automatically generated. Similarly to the development of the application, this class extends the AppComponentBinder abstract class. The developer has to implement all the abstract methods of this class corresponding to the deployment of each context and controller component.
package fr.inria.phoenix.scenario.helloworld.impl;

import fr.inria.phoenix.diasuite.framework.context.presence.AbstractPresence;
import fr.inria.phoenix.diasuite.framework.controller.sendmessagecontroller.AbstractSendMessageController;
import fr.inria.phoenix.diasuite.framework.misc.AppComponentBinder;

/* (non-Javadoc)
 * The binder to provides the various components of the application
 * @see fr.inria.phoenix.diasuite.framework.misc.AppComponentBinder
 */
public class ComponentBinder extends AppComponentBinder {

    @Override
    protected Classextends AbstractPresence> getPresenceClass() {
        return Presence.class;
    }

    @Override
    protected Classextends AbstractSendMessageController> getSendMessageControllerClass() {
        return SendMessageController.class;
    }
}
Table of Contents
This chapter describes how to implement an application for the DiaSuite platform version 3.0. The DiaSuite development methodology is illustrated with a simple example named Mail On TV. The goal of the Mail on TV application is to display all important messages on a TV using the TvMessenger device. Messages are considered important when they are sent by a contact from the address book. It shows also how the plugin can be used to test the application and how it can be deployed.
To understand this documentation, you should first understand the overall principles of DiaSuite as explained in the concept section.
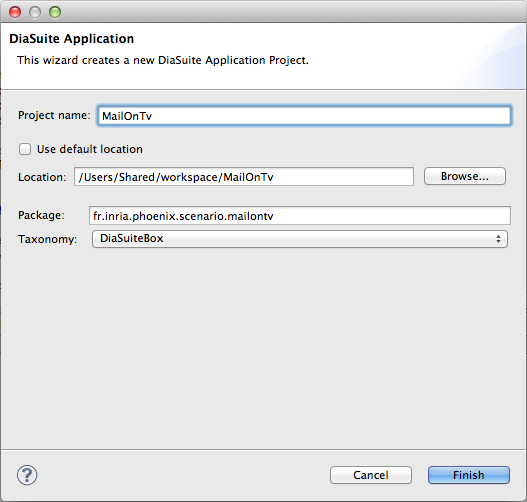
To develop the Mail On TV application, we will create a new DiaSuite project. In Eclipse, click File > New > Project... , then choose DiaSuite Application Project from the list.
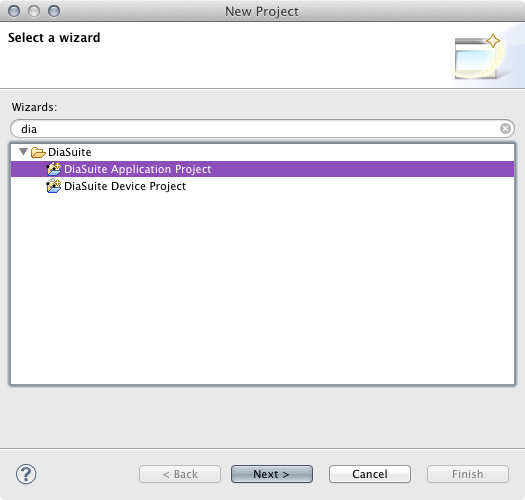
In the next screen, give the project a name and click Finish.
A new project will be created, and the corresponding DiaSpec file will automatically be opened. By default, it has an empty context and controller. We will be filling these in with our own DiaSpec specification.
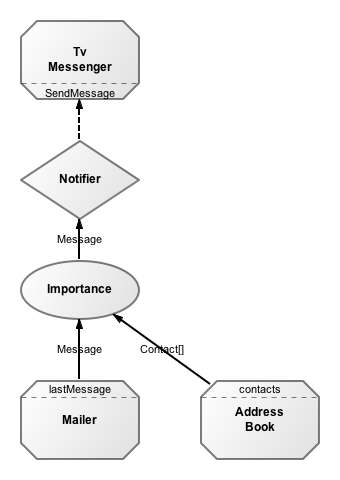
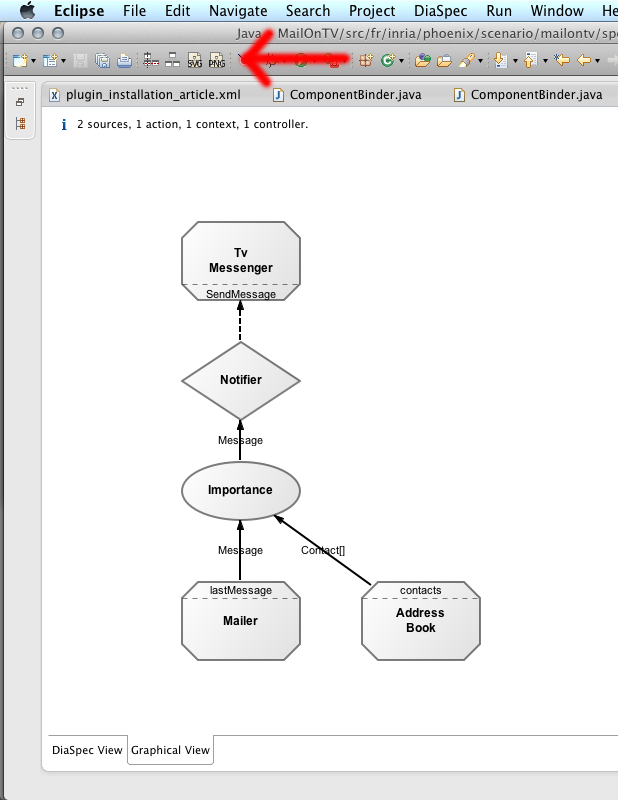
The goal of the Mail on TV application is to display all important messages on a TV using the TvMessenger device. The DiaSpec design is composed of one context named Importance and one controller named Notifier . The Importance context reacts to the lastMessage source and refines it into important messages (important messages are the ones sent by a contact of the address book). When an important message is received, the Notifier controller notifies the user on TvMessenger devices.
In the mailontv.diaspec file, we can write the following DiaSpec specification:
include "taxonomy.diaspec";

context Importance as Message {
    when provided lastMessage from Mailer
      get contacts from AddressBook
      maybe publish;
}

controller Notifier {
    when provided Importance
      do SendMessage on TvMessenger;
}
The include keyword includes the DiaSuiteBox taxonomy that introduces the Mailer , AddressBook and the TvMessenger devices. The rest of the specification describes both the context and the controller.
You can get the graphical view of the application in the "Graphical View" tab of the DiaSpec file:

The DiaSpec specification is used to drive the rest of the development. The section called “Implementation” describes how to implement the Mail On TV application. The section called “Testing” describes how to test your application locally before deploying it on the application store. The section called “Submission to the application store” describes the deployment on the application store. Finally, The section called “Configuration Parameters” explains how to develop an application enabler that let you have configuration parameters for your application.
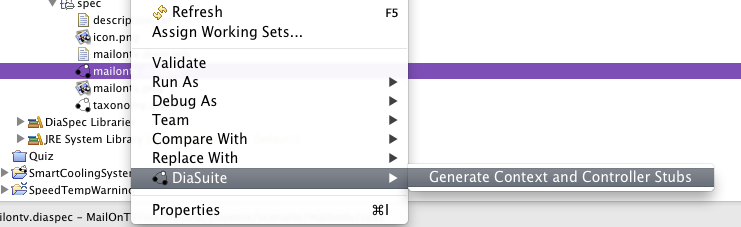
Now, we need to implement the context and controller components. To do so, we generate stubs from the DiaSpec specification, by right-clicking on the DiaSpec file and selecting "DiaSuite" / "Generate Context and Controller Stubs".
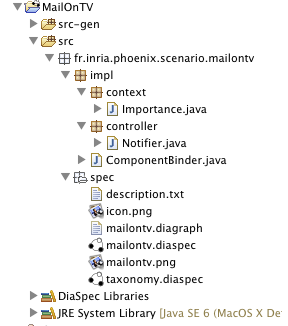
We will first look at the stub generated for the Importance context. The methods we will need to implement here (they can be obtained using the Eclipse feature to auto-generate missing method stubs, inherited from the abstract class we are extending) are onLastMessageFromMailer .
The method onLastMessageFromMailer is called whenever a new mail message is received. The method signature reflects the interaction contract of the context:
protected ImportanceValuePublishable onLastMessageFromMailer(
            LastMessageFromMailer lastMessageFromMailer,
            DiscoverForLastMessageFromMailer discover);
The first parameter contains the actual message received whenever the Mailer publishes, the second parameter, discover, is the mechanism for getting access to an AddressBook. Finally, the return type of the function is how we publish whatever value our context computes. We only want to publish if the sender of the email is in our contact list, otherwise we will ignore the email. Let us examine the implementation of this example:
protected ImportanceValuePublishable onLastMessageFromMailer(
        LastMessageFromMailer lastMessageFromMailer,
        DiscoverForLastMessageFromMailer discover) {

    // retrieve the pushed value from the method parameter
    Message message = lastMessageFromMailer.value();

    // pull the list of contacts from the AddressBook device by
    // using discovery
    List contacts = discover.addressBooks().anyOne()
				.getContacts(message.getSender());

	// if the sender was found among address book contacts
		if ((contacts != null) && (contacts.size() != 0))
			// publish the message
			return new ImportanceValuePublishable(message, true);

    // in other case do not publish the value
    return new ImportanceValuePublishable(message, false);
}
The ImportanceValuePublishable type of the return value comes from the maybe publish declaration of the interaction contract. The first parameter is the value our context returns after computation, the second value, a boolean, says whether we want to publish the result or not. This corresponds to an option type, like in functional languages. In this example, this controls whether the mail gets displayed on the screen or not, since the controller will subscribe to our notifications.
Finally, the controller should be implemented. It is simpler, since it should only subscribe to the context, and will write to the screen any message that is published. Starting with the generated file, Notifier.java , we can use Eclipse's feature to generate missing function stubs. This allows us to fill in the onImportance method, which is triggered whenever the context publishes a value. This time we will only be needing the discovery parameter to find TV messengers, since we are only interested in the published value, and do not need to retrieve other values.
protected void onImportance(ImportanceValue importance,
        DiscoverForImportance discover) {

    // here we retrieve the value pushed from the Importance context
    Message message = importance.value();

    String messageTitle = message.getTitle();
    String messageContent = message.getText();
    List messageAttachements = message.getAttachments();

    // here we use discovery in order to trigger the sendMessage method
    discover.tvMessengers()
            .anyOne()
            .sendMessage(new Contact(), messageTitle, messageContent,
                    messageAttachements);
}
See how we use the value() method to retrieve the Message, then we extract the applicable parts of the message to forward to any available TV messenger. Once again, we could broadcast to all deployed TV devices by using all() instead of anyOne() .
The last step is to define the deployment of the DiaSpec components defined in the DiaSpec specification. This is done by customising the ComponentBinder class, which is an auto generated stub. For each method, for example getImportanceClass , simply returns the corresponding implementation class:
    @Override
    public Classextends AbstractImportance> getImportanceClass() {
        return Importance.class;
    }
To test out your application, you can use the fr.inria.phoenix.diasuite.framework.mocks.Mock class. In this section we will use the JUnit library to test the Mail On TV application.
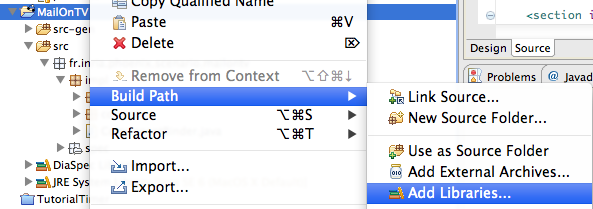
First, we need to add the JUnit library to our project by clicking on the project, then "Build Path" / "Add libraries...". Select "JUnit libraries" and on the next screen, select "JUnit 4".
Create a "tests" source folder as a placeholder for the required tests.
Let's try to test if a TvMessenger actually displays a message. So create a new JUnit Test Case:
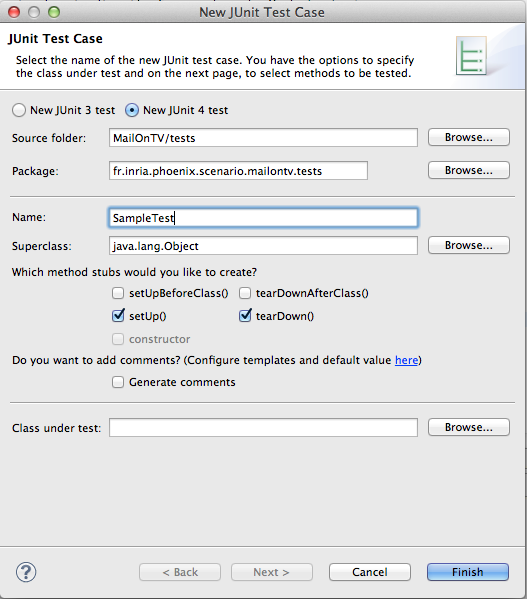
First, statically import the Mock class methods:
import static
				fr.inria.phoenix.diasuite.framework.mocks.Mock.*;
Then let's tell the system wich application we are testing by filling the set-up and tear-down functions:
@Before
    public void setUp() throws Exception {
        underTest(ComponentBinder.class);
    }

    @After
    public void tearDown() throws Exception {
        shutdown();
    }
Finally, let's do the code of the test itself:
@Test
public void test() {
// We get mock (fake) devices
AddressBookMock addrBook = mockAddressBook("MockAddressBook",
"Me");
MailerMock mailer = mockMailer("MockMailer");
TvMessengerMock tv = mockTvMessenger("MockTvMessenger",
"Here", "Me");
// We put fake contacts in the address book
Contact him = new Contact("Him", "
This e-mail address is being protected from spambots. You need JavaScript enabled to view it
",
"0123456789", "9876543210", "", new LinkedList());
LinkedList contacts = new LinkedList();
contacts.add(him);
// this does not publish, just set the value
// for get operation
addrBook.setContacts(contacts, new Contact());
// Publish a last message
mailer.lastMessage(new Message(him, "Hello", "Hallo",
new LinkedList()));
// And expect a message on the tv
assertTrue(tv.expectSendMessage(him, "Hello", "Hallo"));
}
This method gets device mocks and configures them. Using mocks, you can make the device answer certain values on certain sources using the setXXX() methods while simply the source name do a publication on the source. After publishing you can test for action occuring with expectXXX() methods. Those methods return true if the action occurs and matches the given parameters (if a parameter is not specified, then all values are accepted). The action is supposed to not have occured after TIMEOUT milliseconds. This TIMEOUT can be modified any time in your tests.
Before submitting, you will probably want to modify the default icon.png and description.txt, which can be found in the src/ folder, under the spec package. The icon will be used when displaying the app in the app store, and the description.txt file should contain a short text to describe the application. If the application has any configurable options, these should also be described here. The description.txt file is generated, ready to be customised, but if desired, a description_fr.txt file can also be provided. The format is the same as the description.txt file, but should contain a French version of the description. We assume that this has been done already. It is also necessary to generate an image of the specification. This can be done by double-clicking the DiaSpec file (your systems specification), and choosing "Graphical View". After making sure the layout of the diagram is reasonable, click the PNG button in the toolbar.
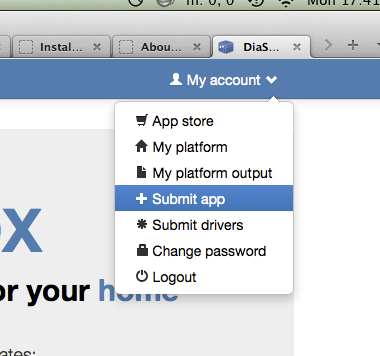
To proceed, simply select File > Export... and choose DiaSuite Submission Package. This will produce a .zip file which can be uploaded to the DiaSuiteBox app store. In our example, this is at diasuitebox.inria.fr . Log in with your user name and password, then select Submit App.
When you upload the zip here, it will be available to all users of the diasuite store, assuming they have compatible Mailer, AddressBook, and TvMessenger devices deployed.
An application enabler adds configuration parameters callbacks to an application. For example, let's say that we want to allow only mail from a specified contact instead of mail from all contacts in the address book. We will skip the modification of the application that is pretty straightforward and just look at how to add a configuration parameter called "contact" that is the name of the contact whose mails are going to be displayed on the TV.
To do so, let's implement the fr.inria.diagen.core.enabler.AbstractApplicationEnabler abstract class:
public class MyApplicationEnabler extends AbstractApplicationEnabler {
    public static String CONTACT = "default";
    private static String CONTACT_KEY = "contact";

    public MyApplicationEnabler() {
        super("MailOnTv",
            Arrays.asList(new PropertyInfo(CONTACT_KEY,
                "Contact",
                "Name of the contact whose mail are going " +
                "to be displayed on the TV",
                PropertyFormat.Text,
                CONTACT)));
    }

    @Override
    public boolean isValid(String propertyName, String propertyValue) {
        return true;
    }

    @Override
    public void propertyChanged(String propertyName, String propertyValue) {
        if(propertyName.equals(CONTACT_KEY))
            CONTACT = propertyValue;
    }
}
The constructor takes a name and a list of PropertyInfo that describes the available settable properties of the application. The constructor of the PropertyInfo class asks for a property name (i.e., its unique identifier inside the application), a property title, a description for the user, a type (one of the PropertyFormat enum) and a default value.
When the user sets the property on the web interface, the isValid(propertyName, propertyValue) function is called to verify that the propertyName property can be set with the propertyValue value. If that function returns true and the user saves, then the propertyChanged(name, value) method is called to set the property name to value .
Now this enabler should be declared in the constructor of the ComponentBinder class using the setApplicationEnabler() method.
Table of Contents
This chapter describes how to implement a device driver for the DiaSuite platform version 3.0. It explains what is an entity (i.e. a device) in the DiaSpec language and how it is translated into code by way of two simple examples (a timer and an electric meter). It shows also how the plugin can be used to test the entity implementation and how it can be deployed.
To understand this documentation, you should first read the overall principles of DiaSuite, as explained in the concept section.
An entity of the device taxonomy is a device itself (we use indifferently device or entity for it). It can represent a physical device (e.g., a remote controllable light, a button, a television, a motion detector, ...) or a service device (e.g. a clock, a messenger, ...).
Each entity can expose sources of data and actions. Sources represents data sensed from the environment while actions are used to acts on the environment. Entities can inherit from other entities. The list of usable entities is fixed in the device taxonomy.
To illustrate this documentation we will use two examples of entities: a timer and a electric meter. The description of this documentation will focus on those two entities and, again, if you need a better grasp on entities, please read the general documentation.
A timer, as defined in current taxonomy, is a device that can be set to publish an event after a certain duration. It is defined in the taxonomy by:
device Device {
    attribute id as String;
}

device Service extends Device {
}

device BuiltIn extends Service {
}

action ScheduleTimer {
    schedule(id as String, delayMs as Integer);
    periodicSchedule(id as String, delayMs as Integer, periodMs as Integer);
    cancel(id as String);
}

device Timer extends BuiltIn {
    source timerTriggered as String indexed by timerId as String;
    action ScheduleTimer;
}
This listing presents only the part relevant to the Timer device. First, the Device entity super-seeds all devices and declares an attribute id. An attribute is a fixed data associated to a specific instance of a device (here, it represents the identifier of the device).
To define a correct hierarchy, a Timer inherits from BuiltIn who inherits from Service who inherits from Device.
A timer exposes an action ScheduleTimer which is an interface for three methods: schedule, periodicSchedule and cancel. schedule schedules a timer identified by id in delayMs milliseconds. periodicSchedule schedule a periodic timer identified by id in delayMs milliseconds and retriggers the timer every periodMs milliseconds. cancel cancels a scheduled timer identified by id.
A timer also exposes a timerTriggered source that will be triggered when a scheduled timer expires. The value of the source will be the identifier of the timer and it will be indexed for convenience by this same identifier.
The section called “Timer implementation” describes how to implement and test a timer using the Eclipse plugin. It consists mainly on implementing actions of the device and publishing information on its sources.
An electric meter, as defined in current taxonomy, is a physical device that can publish how much electricity is consumed:
device Device {
    attribute id as String;
}

device PhysicalDevice extends Device {
    attribute location as String;
    attribute user as String;
}

device Sensor extends PhysicalDevice {
}

device EnergyMeter extends Sensor {
}

device ElectricMeter extends EnergyMeter {
    source currentElectricConsumption as Float;
}
This listing presents only the part relevant to the ElectricMeter device. It is an energy meter, which is a sensor, which is a physical device which is a device with a location and maybe a user. An electric meter can publish the consumption through a floating point value.
The section called “Electric meter implementation” describes how to implement and test an electric meter. It will concentrate on the usage of device enablers to configure device instances.
In this section, we present the implementation of the two devices. The implementation of a timer in The section called “Timer implementation” shows how to program a simple device with no configuration. It will go step by step on using the Eclipse plugin for doing so. The second implementation, an electric meter in The section called “Electric meter implementation”, is used to shows how to create on the fly instances of configurable devices using a device enabler.
In this section, we present the implementation of the timer device which was presented in The section called “Timer”. This section supposes that you have Eclipse with the DiaSuite features installed.
Create a device project.
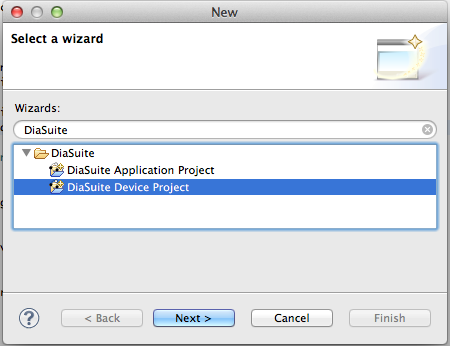 |
You should first create a project. In Eclipse, go to File > New > Project... (or Ctrl+N). Select the DiaSuite Device Project in the DiaSuite folder. You can then select the name of your project and the taxonomy you want to use.
Create your device implementation.
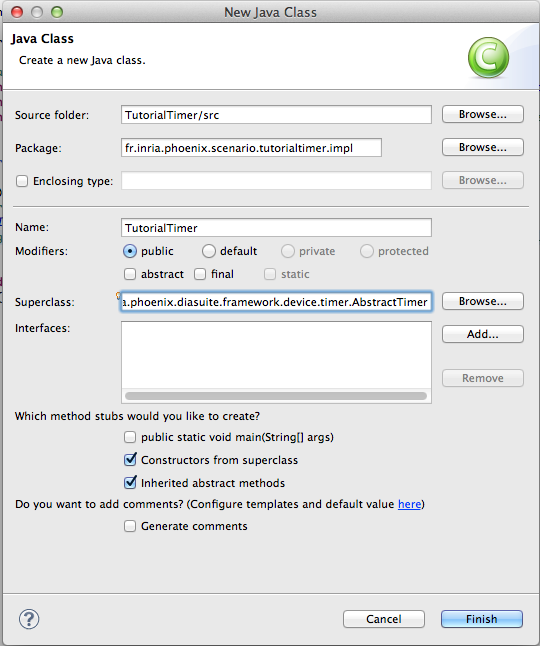 |
Now create a class that extends the fr.inria.phoenix.diasuite.framework.device.timer.AbstractTimer class which is the abstract class for a timer. With the Eclipse facilities, you get to implement the missing abstract methods. Using java.lang.Timer, the resulting implementation would look like this:
package fr.inria.phoenix.scenario.tutorialtimer.impl;

import java.util.HashMap;
import java.util.Map;

import fr.inria.diagen.core.ServiceConfiguration;
import fr.inria.phoenix.diasuite.framework.device.timer.AbstractTimer;

public class TutorialTimer extends AbstractTimer {

    private Map timers =
            new HashMap();

    public TutorialTimer(ServiceConfiguration serviceConfiguration) {
        super(serviceConfiguration, "TutorialTimer");
            The name parameter is an identifier of the implementation.

    }

    @Override
    protected void cancel(String id) throws Exception {
            Implements the cancel() method of the
            ScheduleTimer action.

        if (timers.containsKey(id)) {
            timers.get(id).cancel();
            timers.remove(id);
        }
    }

    @Override
    protected void schedule(String id, Integer delayMs)
            throws Exception {
            Implements the scedule(id, delayMs) method of the
            ScheduleTimer action.

        if (!timers.containsKey(id)) {
            timers.put(id, new java.util.Timer());
        }
        final String timerId = id;
        java.util.Timer timer = timers.get(id);
        timer.schedule(new java.util.TimerTask() {
            @Override
            public void run() {
                publishTimerTriggered(timerId, timerId);
            Publish on the source timerTriggered.

            }
        }, delayMs);
    }

    @Override
    protected void periodicSchedule(String id, Integer delayMs,
            Integer periodMs) throws Exception {
            Implements the periodicSchedule(id, delayMs, periodMs) method of the
            ScheduleTimer action.

        if (!timers.containsKey(id)) {
            timers.put(id, new java.util.Timer());
        }
        final String timerId = id;
        java.util.Timer timer = timers.get(id);
        timer.scheduleAtFixedRate(new java.util.TimerTask() {
            @Override
            public void run() {
                publishTimerTriggered(timerId, timerId);
            Publish on the source timerTriggered.

            }
        }, delayMs, periodMs);
    }

}
There is not much to say about the implementation. It is pretty straightforward. Methods of declared actions are abstract in the parent class and this should be implemented. To signal new data to the application, the publishTimerTriggered() method can be used. One for each source is generated. The value published on a source with this method will be returned also by next data requirement on the device.
Create your device activator. The activator is a class to "activate" devices, it declares devices instance with the addDevice() method. It also declares names and description of this device implementation. After that the device implementation is over. You can test it.
package fr.inria.phoenix.scenario.tutorialtimer.impl;

import fr.inria.diagen.commlayer.driver.DeviceActivator;

public class Activator extends DeviceActivator {

    private static final String DEVICE_DESCRIPTION =
            "A timer implementation";
    private static final String DEVICE_NAME = "Tutorial Timer";
    private static final String DEVICE_ID =
            "fr.inria.phoenix.diasuite.tutorial.device.timer";

    /**
     * The constructor
     */
    public Activator() {
        super(DEVICE_ID, DEVICE_NAME, DEVICE_DESCRIPTION);
    }

    protected void onInitialize() {
            We do the initialization

        addDevice(new TutorialTimer(
                getServiceConfiguration("TutorialTimer")));
            Adds a timer instance to the list of available devices. The get
            service configuration only requires an identifier for the instance.

    }

    public static void main(String[] args) throws Exception {
        new Activator().execute(args);
    }
}
Testing your driver. To test your driver, you should first run a test device server by right click on the project, "Run as...", "Test server for device". The test server is controllable using the console. You can type "help" to get the list of available commands.
You can now run your driver by right click on the project, "Run as...", "Local device (test)". It will open a shell and the driver will connect to your local instance.
So in the server shell, after the launch of the client shell, you will see the event Registered client remote-3903 where remote-3903 is the client identifier. Then you will see the event Added device Timer as Timer11296 where Timer11296 is the identifier of the device on the server side. So now you can trigger an action (here schedule): action remote-3903 Timer11296 schedule "timer" 1234. You will see the publication of the timerTriggered source. You can do a get on get remote-3903 Timer11296 timerTriggered "timer". The rest of the usage of the testing client/server interface is explained in the next section.
Releasing your driver. Once you have tested your driver, you can connect to the server by right click on the project, "Run as...", "Remote device (production)". The driver will connect using authentication to the cloud platform and you will be able to use it.
You can create a releasable jar by using the eclipse export menu and select "Runnable JAR file" in the "Java" folder. For that to work you have to create a Java launcher by right click on the Activator class, "Run as...", "Java Application". After that you can select that launch configuration in the export runnable JAR window. Don't forget to package required libraries in that JAR to be a standalone JAR.
If you think that your driver belongs in the cloud or that it should be built-in in the platform, then you should submit it to the DiaSuite platform team. To do so, export your project with the "DiaSuite submission package" format. It will create a ZIP you can send to the DiaSuite platform team email: <
This e-mail address is being protected from spambots. You need JavaScript enabled to view it
>.
In this section, we present the implementation of the electric meter device which was presented in The section called “Electric meter”. This section supposes that you have Eclipse with the DiaSuite features installed.
The usual project creation. First create a DiaSuite Device Project and implement a class extending the fr.inria.phoenix.diasuite.framework.device.electricmeter.AbstractElectricMeter abstract class as described in previous section.
The implementation.
package fr.inria.phoenix.scenario.tutorialelectricmeter.impl;

import fr.inria.diagen.core.ServiceConfiguration;
import fr.inria.phoenix.diasuite.framework.device.electricmeter.AbstractElectricMeter;

public class TutorialElectricMeter extends AbstractElectricMeter
		implements Runnable {

    private Thread t;
    private boolean stop = false;

    public TutorialElectricMeter(ServiceConfiguration serviceConfiguration,
    		String idValue) {
        super(serviceConfiguration, idValue, "", "");

    }

    // Provide property setters for user and location
    void setUser(String user) {
        updateUser(user);
    }

    void setLocation(String location) {
        updateLocation(location);
    }

    // We override post initialize to run the thread
    @Override
    protected void postInitialize() {
        super.postInitialize();
        t = new Thread(this);
        t.start();
    }

    // To stop the thread
    @Override
    protected void preUninitialize() {
        super.preUninitialize();
        synchronized (this) {
            stop = true;
        }
        try {
            t.join();
        } catch (InterruptedException e) {
        }
    }

    @Override
    public void run() {
        // Infinite loop
        do {
            // Stop the thread ?
            synchronized (this) {
                if (stop)
                    return;
            }
            // Sleep for 5s
            try {
                Thread.sleep(5000);
            } catch (InterruptedException e) {
            }
            // Get the data from the device
            publishCurrentElectricConsumption(
            	getCurrentElectricConsumption()); // publish
        } while (true);
    }

    // React to get value from contexts
    @Override
    protected Float getCurrentElectricConsumption() {
        // In a real example, this should be replaced with the
        // call to an external library
        return 0.42f; // dummy example value
    }
}
Compared to the timer, we don't have actions in that device. We illustrate the use of regular polling of the physical device using a thread. This thread is launched inside the postInitialize() method and stopped inside the preUninitialize() method. Those two methods are called respectively right after activating the device and right before shutting it down.
Another implementation is that the getCurrentElectricConsumption() is overloaded to report the electric consumption when requested. If this method is not overloaded, then the last value published is returned when requesting the value, or null if no last value was requested.
Create your device enabler. The enabler is a class that allows you to configure and activate instance of your devices. It is an implementation of the fr.inria.diagen.core.enabler.DeviceEnabler interface. It is best to implements the fr.inria.diagen.core.enabler.AbstractDeviceEnabler abstract class rather that implenting the interface directly. It defines a set of properties for the drivers and for each device instance. It also signals when a device is added or removed. An example implementation follows.
package fr.inria.phoenix.scenario.tutorialelectricmeter.impl;

import java.util.LinkedList;
import java.util.List;

import fr.inria.diagen.core.deploy.AbstractDeploy;
import fr.inria.diagen.core.enabler.AbstractDeviceEnabler;
import fr.inria.diagen.core.enabler.PropertyFormat;
import fr.inria.diagen.core.enabler.PropertyInfo;
import fr.inria.diagen.core.service.local.Service;

public class TEMEnabler extends AbstractDeviceEnabler {

    public TEMEnabler(AbstractDeploy deploy) {
        super(deploy,
                "tutorialelectricmeter", // a uniq key
                true, // user can add device
                true); // user can delete device
    }

    @Override
    public String getName() {
        return "Tutorial Electric Meter"; // a name for the user
    }

    @Override
    public String getDescription() {
        return "A description for the user";
    }

    @Override
    public List getPropertiesInfo() {
        // Return the list of properties for one device
        List list = new LinkedList();
        list.add(new PropertyInfo("location", // key of the property
                "Location", // A name to display to the user
                "The location of the device", // A tooltip for the user
                PropertyFormat.Text, // The format (text, password...)
                "")); // Default value
        list.add(new PropertyInfo("user", "Username", "User name",
                PropertyFormat.Text, ""));
        return list;
    }

    @Override
    protected void entryAdded(String entryKey) {
        // Called when the user ask for a new device
        // We create the device
        TutorialElectricMeter em = new TutorialElectricMeter(
                getServiceConfiguration(entryKey), entryKey);
        // And we add it to the list of declared device
        addServiceInstance(entryKey, em);
    }

    @Override
    public void propertyChanged(String entryKey,
            String propertyKey, String propertyValue) {
        // Called when a property is modified
        Service s = getServiceInstance(entryKey);
        if (s instanceof TutorialElectricMeter) {
            TutorialElectricMeter em = (TutorialElectricMeter) s;
            if (propertyKey.equals("location")) {
                // Set the location
                em.setLocation(propertyValue);
            } else if (propertyKey.equals("user")) {
                // Set the user
                em.setUser(propertyValue);
            }
        }
    }

    @Override
    protected void entryRemoved(String entryKey) {
        // Called when requested to remove a device
        removeServiceInstance(entryKey); // nothing else to do
    }
}
This implementation is self-explaining, it allocate new devices when the user request it and set properties accordingly. The only tricky part is the getPropertiesInfo() which returns the list of properties used by the enablers. Each property has a name and a description but also a type and a default value. Please see fr.inria.diagen.core.enabler.PropertyFormat enumeration values for the list of possible types.
Now you just need to call the addEnabler method in your activator constructor to add this enabler to the list of usable activator. The activator is an implementation of fr.inria.diagen.core.deploy.AbstractDeploy so you can pass the activator instance as the first argument of the enabler.
Testing your driver. To test the driver, the procedure is the same as before to launch the server. You can see your enablers using the enablers command and if you add the enablers name after you see the full description of the device.
You can now add a device: add "Tutorial Electric Meter". With the get and set methods you can change those properties.
Finally, when submitted to the platform version, the enablers will be a page like the one you get for the Google driver:
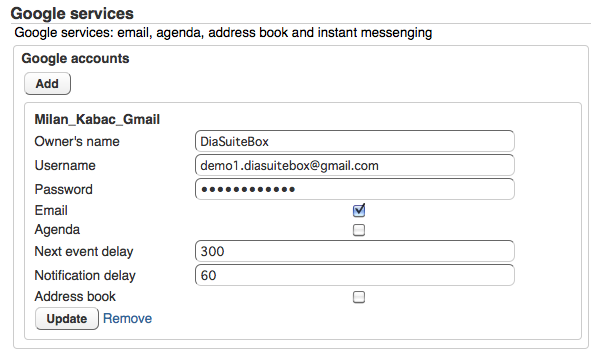 |
Table of Contents
This chapter describes the DiaSpec grammar and the type system.
A basic DiaSpec file is a list of items (keywords are in bold and italicized, terminals in italic and rules in normal font, spaces are all semantically equivalent):
 DiaSpec              -> (Include | Statement)*
 Include              -> include string ;
 Statement            -> TypeDef | Action | Device | Context | Controller

 TypeDef              -> EnumDef | StructDef
 EnumDef              -> enumeration id { id (id ;)* }
 StructDef            -> structure id { (Type id ;)* }

 Type                 -> Type [] | id
 Variable             -> varName as Type

 Action               -> action id { ActionElement+ }
 ActionElement        -> varName ( Variable (, Variable)* )

 Device               -> device id (extends id)? { (DeviceAttribute | DeviceSource | DeviceAction)* }
 DeviceAttribute      -> attribute Variable ;
 DeviceSource         -> source Variable (indexed by Variable (, Variable)*)?
 DeviceAction         -> action id ;

 Context              -> context id as Type (indexed by Variable (, Variable)*)?
                        { ContextInteraction* }
 ContextInteraction   -> when (required this? | provided Source)
                         (get SourceList)? (always | no | maybe) publish ;
 SourceList           -> (varName from id) | id) (, ((varName from id) | id))*
 Source               -> (varName from id) | id)

 Controller           -> controller id { ControllerInteraction* }
 ControllerInteraction   -> (when provided id)
                         (get id (, id)*)? do id on id (, id on id)+ ;
Terminals are:
- string is a Java string delimited by double quote (")
- id is a Java identifier. Keywords of the DiaSpec language are not valid ids
- varName is a Java identifier (DiaSpec keywords included)
- Javaclass is a full Java class name (with the package path)
Moreover, C-like comments (or Java comments, i.e., // and /* */) are used to comment the DiaSpec file
Basic types in DiaSpec can be:
- Native types
- Constructed types (enumeration, structure and list)
- Imported types
DiaSpec support five native types:
- Integer is an integer number translated into the native java Integer type
- Boolean is a true / false value translated into the native java Boolean type
- String is a string of characters translated into the native java String type
- Float is a floating point number translated into the native java Double type
- Binary is a random size binary structure translated into a java array of byte values
Every type can be combined into constructed types
- A list is translated into the Java List type and is declared using brackets '[]'. For instance, you can declared a list of integers with Integer[]
- An enumeration is a type that can take a delimited set of values and is translated into a Java Enumeration. You can define an enumeration A that can take one of the following values: val1, val2, val3 by:
enumeration A { val1, val2, val3 } - A structure is a compound type (like the C struct type). You can define a structure B that have two fields a and b of respective types Integer and Boolean by:
structure B {
  Integer a;
  Boolean b;
}